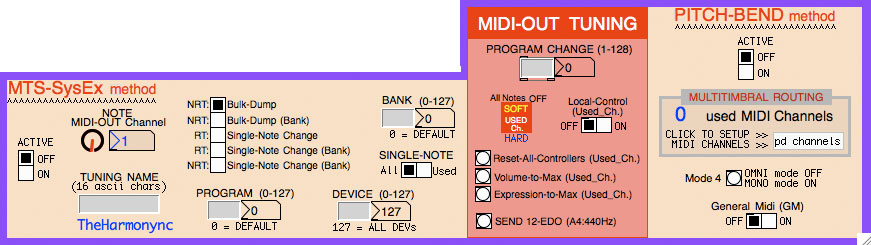
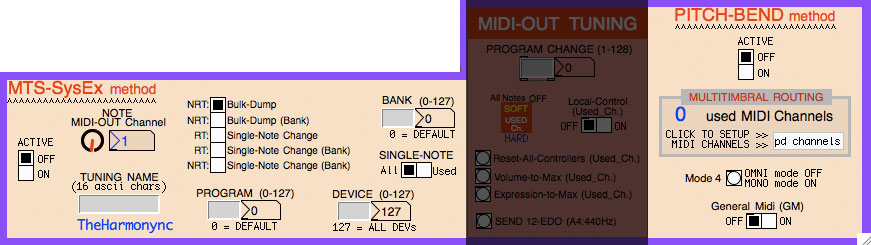
Let’s see one of the most important feature of the Harmonync: the MIDI-OUT TUNING.
So, how to play overtones on your electronic instruments via MIDI?
You have to use a physical or virtual tunable instrument, like synthesizers and samplers (for the sake of clarity: not a drum machine!). The instrument must be MIDI compliant and must accept, at least, the pitch bend change messages *.
In this tutorial we are dealing with the simplest MIDI configuration only.
Now we have to set the proper MIDI ports.
* Please, note that actually MIDI in/out feature is partially untested under Windows.
Table of Contents
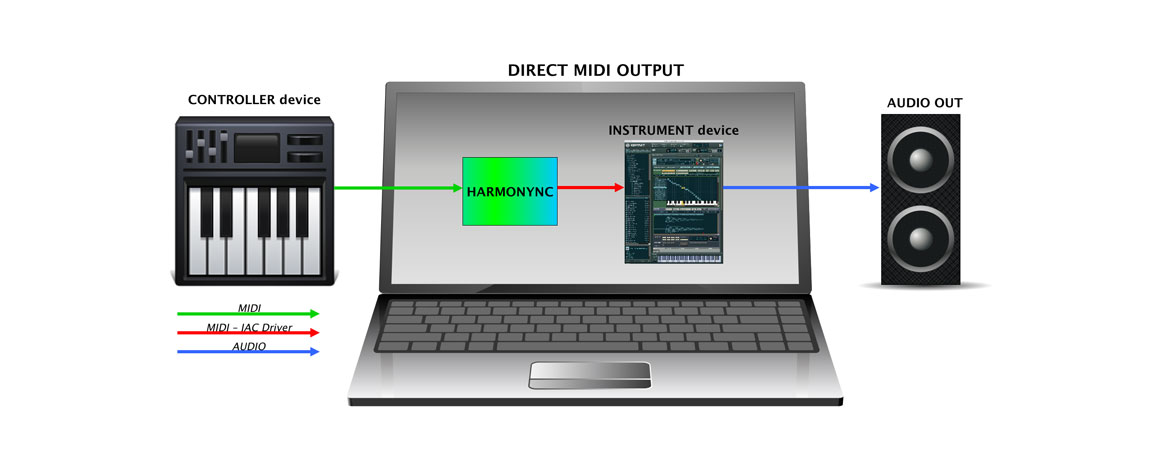
Physical instrument
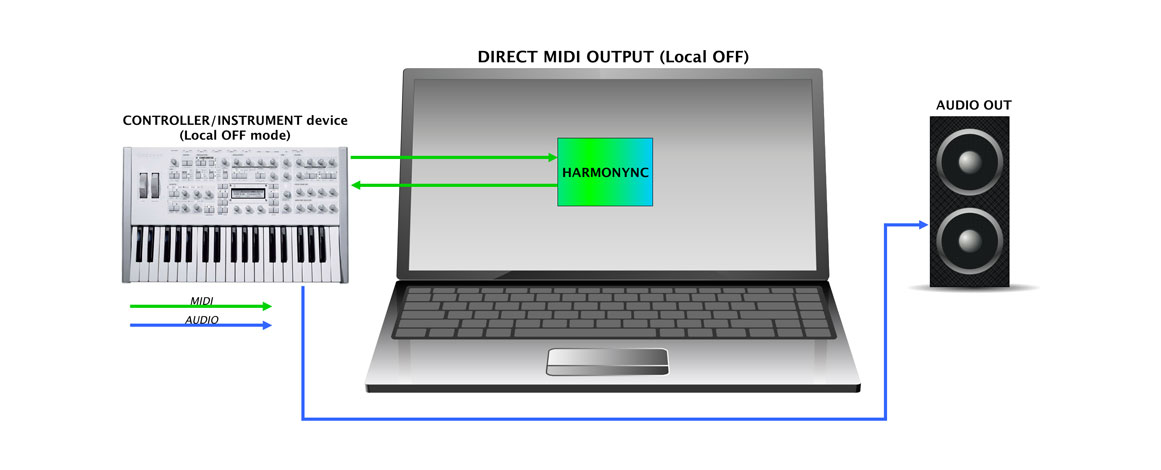
In this scenario the MIDI output goes directly to the external instrument.

You have to configure the output MIDI port in Pure Data. Remember? In the “First run” tutorial we left it unset.
- Open the “MIDI Settings” under “Media” menu.
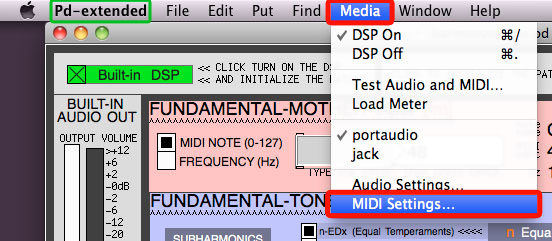
- Set the device port connected to the machine you want to play as “Output device number one”.
If you have physical MIDI instrument, I think you are able to route it correctly. If not, read its user guide.
If your instrument has the Local Control setting, you can also use its keyboard as controller device. When the Local Control is set to OFF the instrument turns off the keyboard’s connection to its local synthesizer and its signals are sent to the input of the Harmonync, that resends the retuned message back to the instrument’s input. To set Local Control OFF in your instrument read its user guide.
If you haven’t a physical instrument, you can play a virtual instrument. If you are not interested, skip the next part and jump to: The better tuning method .
Virtual instrument
It’s possible to play a virtual instrument on Win, Mac and Linux provided you use the appropriate software and system settings. In this tutorial I will explain how to do it using Mac. On OS X you can use the native IAC bus driver.
 Let’s see how to do this:
- Close Pure Data, your DAW or your virtual instrument.
- Open Applications/Utilities/Audio MIDI Setup.
- If you have Mac OS X Leopard (10.5) or below, there is one window with “Audio Device” and “MIDI Device”. You have to click on “MIDI Device”.
- If you have Mac OS X Snow Leopard (10.6) or above, there are two windows: “Audio Device” and “MIDI Studio”. Click on the “Window” menu, and then on “Show MIDI Window” if it is not already open.
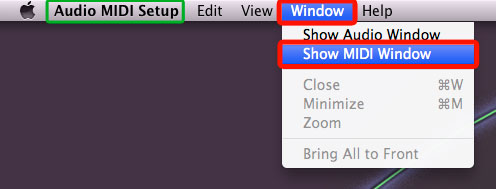
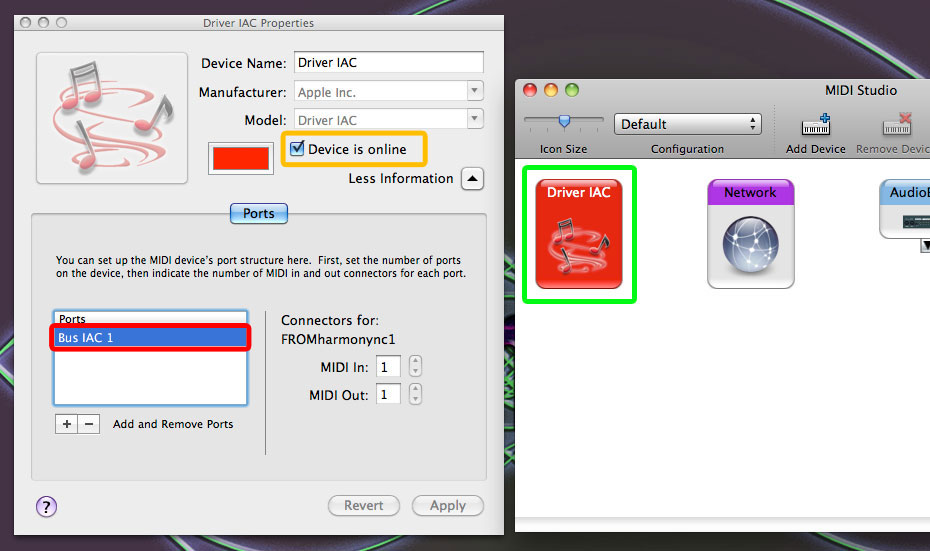
- Double click on “Driver IAC” and…
- Check the “Device is online” checkbox . Now You have a new virtual MIDI port, named “Bus IAC 1”. Click on [+] button to add port if needed. Then click OK.
- Open the Harmonync patch.
- Under “Media” menu, open “MIDI Settings” and select “Bus IAC 1” as Output Device. Click OK.
- Now you have to open your instrument. A virtual instrument can be loaded in a DAW like Logic, Cubase, Live, Ardour, etc. Some virtual instruments come also with a stand-alone version that you can load without a DAW.
- You just have to set “Bus IAC 1” as a MIDI input port in your DAW or in the stand-alone instrument. Since the interfaces are very different, you have to know how to configure the input port of your software.
The better tuning method
There are two MIDI tuning methods. Actually there are two best ways to retune a MIDI compliant instrument:
- Using the ratified MIDI Tuning Standard protocol (abbreviated is MTS), via MIDI System Exclusive messages.
- Using the notes of the standard equal temperament (12-EDO), with the right amount of pitch bend change (message).
The two methods are mutually exclusive.
Since practically no producer implemented the MIDI Tuning Standard protocol, it is almost useless!
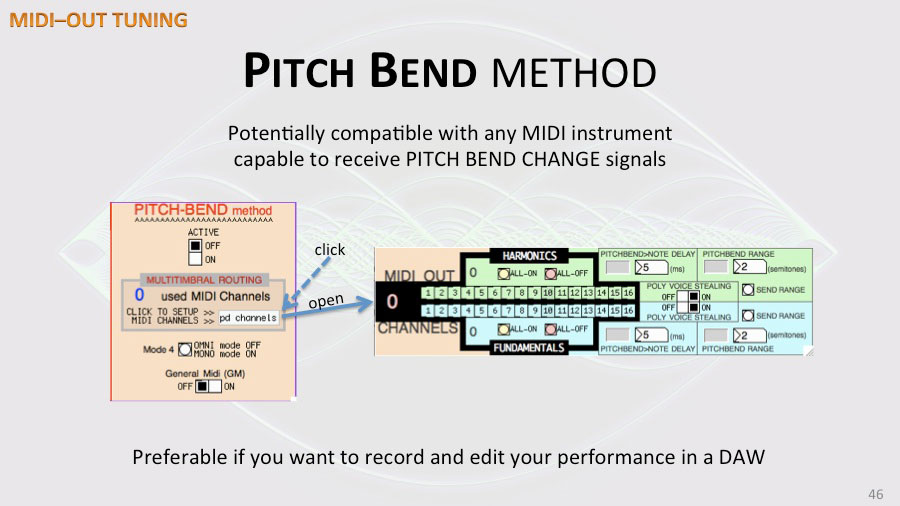
On the contrary, the Pitch Bend Method is potentially compatible with any MIDI instrument capable to receive pitch bend change signals. It’s also preferable if you want to record and edit your performance in a DAW, because system exclusive signals are not so easy to handle. So, in this guide, I show you how to retune instruments by Pitch Bend Method.

The better instrument for the pitch-bend method
The Pitch Bend Method works by adjusting the tuning using the “pitch-wheel”:
- The pitch-wheel can be controlled by Pitch Bend Change messages.
- There is just a pitch-wheel per channel.
- When you move a pitch-wheel, all the voices on that channel are transposed.
- You cannot apply a different pitch-bend, individually to the voices of a single channel.
This is a problem with polyphony:
If you press a key that sets the pitch-bend to the value X and, without releasing it, you press another key that sets the pitch-bend to the value Y, also the first key will be transposed by value Y .
This is the limit of this tuning method.
To overcome this limitation, we send each voice of polyphony to a different output channel. In a MIDI port there are 16 channels. Actually the Harmonync can manage just one port. So, the maximum number of channels (and voices) is 16.
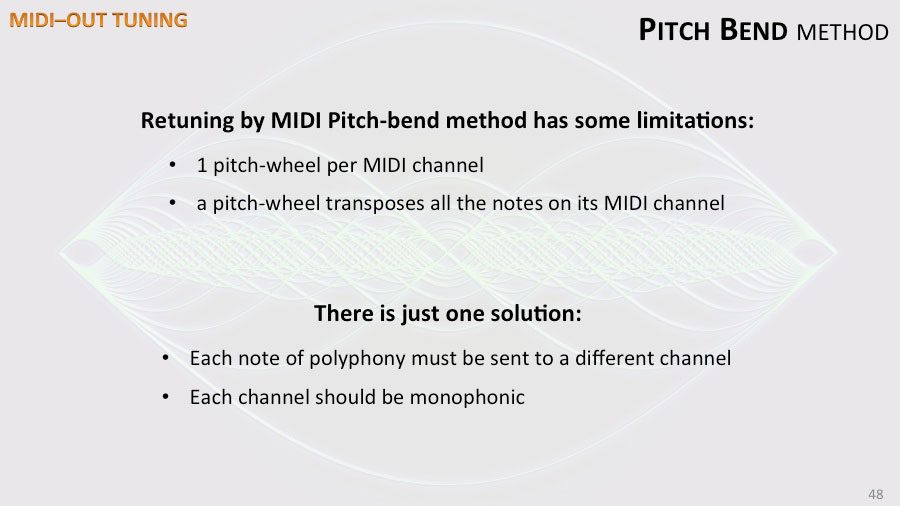
But there is another problem: not all MIDI instruments can properly manage inputs from different channels.
The optimal solution
The optimal solution to this problem are multitimbral instruments like guitar synthesizers and, in general, any MIDI Channel Mode 4 capable instrument. In this way, each voice of polyphony is tunable independently of the others.
Usually this type of instruments are also Multi Output. I recommend a multitimbral instrument with at least 2 output stereo audio channels.
MIDI Channel Modes
If you have to play instruments by using the MIDI OUT Pitch Bend Method, you should know about MIDI Channels, OMNI, POLY and MONO settings.
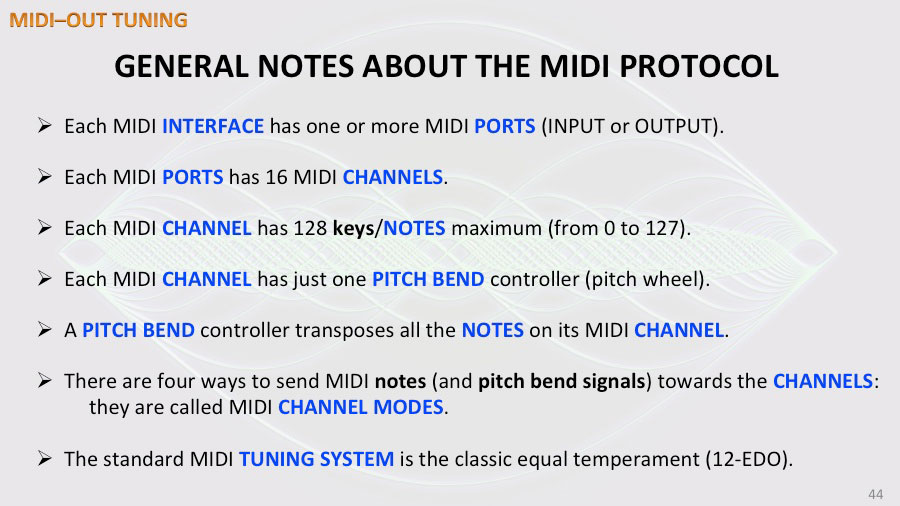
According to the MIDI specifications, Polyphonic Instruments could be set in four different ways called “Channel Modes” or “Receiver’s Mode”.
- Mode 1 : OMNI ON, and POLY.
- Mode 2 : OMNI ON, and MONO.
- Mode 3 : OMNI OFF, and POLY.
- Mode 4 : OMNI OFF, and MONO
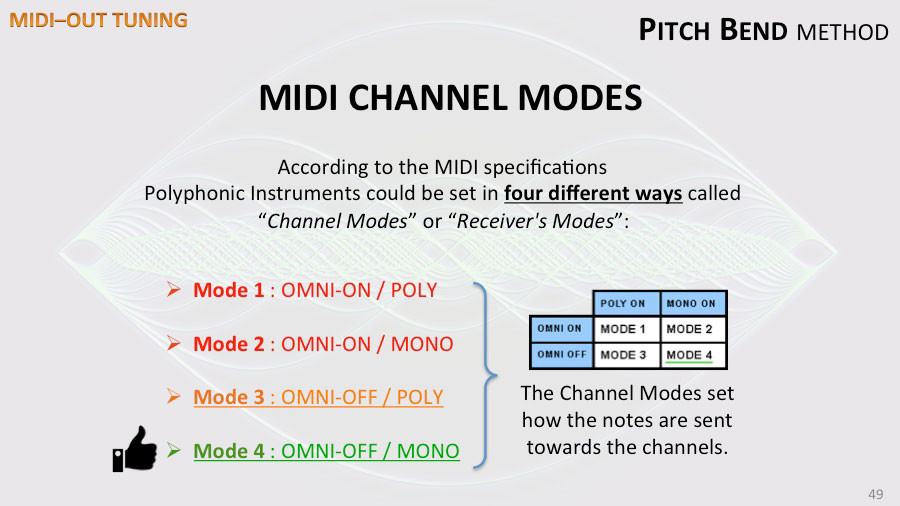
The best is MODE 4, also called Guitar Mode, where each note of polyphony is routed to a separated MIDI channel. Usually multitimbral instruments and guitar synthesizers are MODE 4 capable. In this mode, you can avoid all possible sound artifacts and aberrations because each voice of polyphony is tunable independently of the other voices (like with the guitar, when you are bending the individual strings).
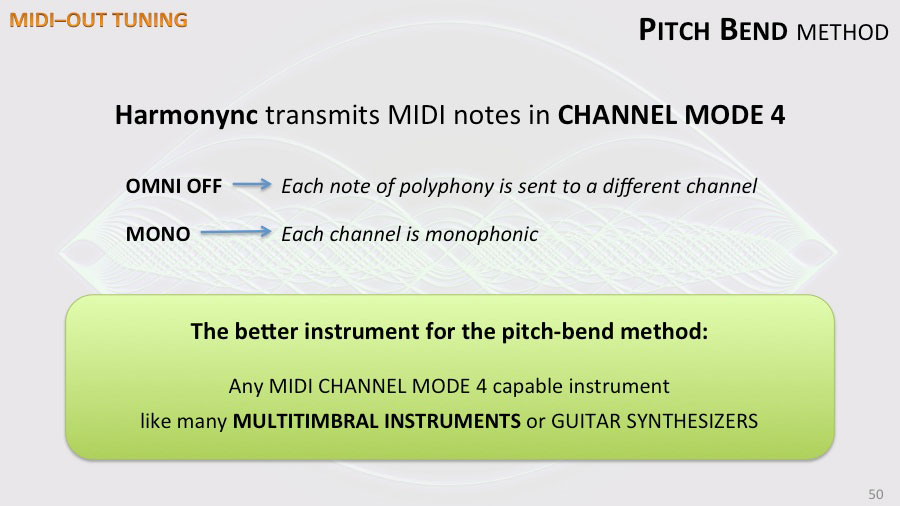
MODE 3 is also good, but if you use sounds with a long sustain or release, you could get into bad sound phenomena. By setting more polyphony voices (more than necessary) you can reduce the likelihood of sound artifacts.
So, you have to set the right “channel mode” in your instrument. See your instrument documentation.
Set the Channel Mode 4 via MIDI messages
With some instruments you can set the channel mode via MIDI channel mode messages. You can try to set Channel MODE 4 (OMNI OFF and MONO) to your instrument just clicking here:![]()
Retuning with pitch-bend method
In the PITCH-BEND method box turn “Active” to “ON”.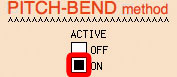
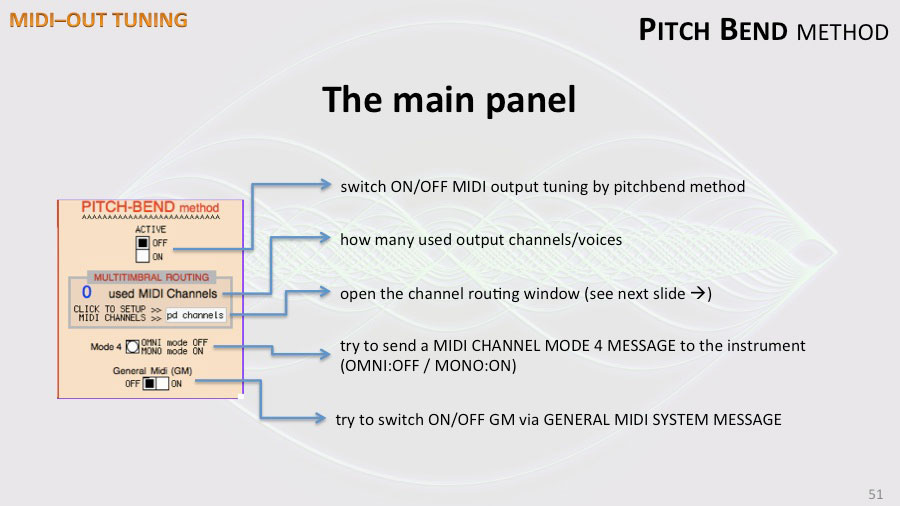
MIDI channel routing
Now, under “MULTITIMBRAL ROUTING”, click on “pd channels“.![]()

Assigning MIDI Channels
In this window you can assign channels to the Fundamental Tones (FT) or to the Harmonic Tones (HT).
- A channel cannot be assigned to both, Fundamental and Harmonic.
- Each channel corresponds to one voice of polyphony.
For example, if you want 3 voices of polyphony for the Fundamentals and 5 voices for the Harmonics, you can check channel number 1, 2, and 3 on the BLUE side, and from number 4 to number 8 on the GREEN side.
And here, for convenience, you can select “ALL channels ON” or “ALL channel OFF”.![]()
However, before you set the channel/voice routing you have to choose the right instrument to use, know how many channels it can manage and how to set it up. In view of our needs an instrument can be:
- Multi Timbral
- Multi Output
- Channel Mode 4 capable (guitar mode)
- None of the above
Read the first part of “MIDI tuning over Logic Pro – Where to start” to better understand what these features means.
As I said, I recommend a multitimbral instrument with at least 2 output stereo audio channels (multi-output) . Multitimbral instruments are usually multi-output and guitar mode capable.
8 voices of polyphony are more than enough. With 8 voices the best configurations are:
- 2+6: 2 voices for the FUNDAMENTALS, and 6 voices for the HARMONICS.
- 3+5: 3 voices for the FUNDAMENTALS, and 5 voices for the HARMONICS.
I recommend to set one more voice of polyphony than you need, because some instrument could wrongly manage the voice stealing process and you might get clicks or bad sound artifacts.
MIDI Channel #10 and GM
Pay attention to the channel number 10: note that’s in gray. General MIDI compliant instruments have the channel 10 usually reserved for percussion sets.
In some instrument you can turn ON and OFF General MIDI mode via MIDI System Exclusive. You can try to send ON-OFF messages, here: ![]()
Three other settings
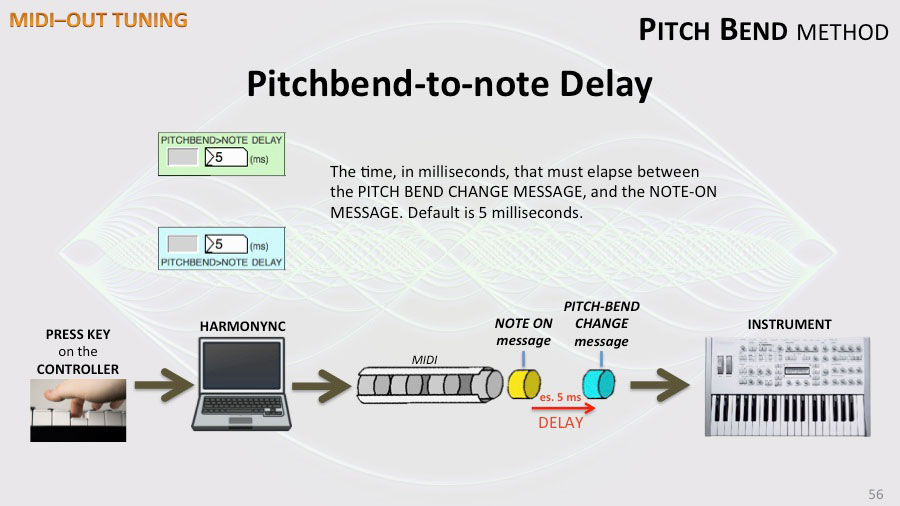
There are three other settings because Pitch Bend Change signals must be properly set in order to obtain the right frequency.
Pitchbend-to-note Delay.
“PITCHBEND>NOTE DELAY” is the time (in milliseconds) between sending the Pitch Bend Change message and the Note-ON message. Default is 5 milliseconds. In other words, it is the time that must elapse between the movement of the pitch-wheel and the key pressure.
Some older or analog machines are slower and need more time. If it is necessary, you can modify this value.
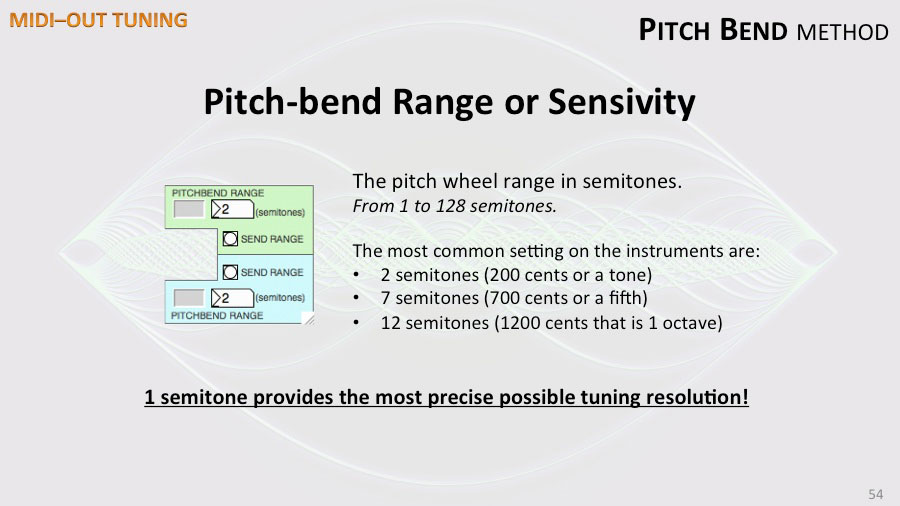
Pitch bend Range or Sensitivity
The Pitch Bend range is expressed in semitones. The default value is 2. It means ±2 semitones. In other words it is the range, also called sensitivity, of the pitch-wheel. Some instruments have not a physical pitch-wheel but can receive Pitch Bend Change messages.
The most typical default setting are:
- 200 cents (2 semitones, or 1 tone),
- 700 cents (7 semitones, or a fifth) and,
- 1200 cents (12 semitones, that’s 1 octave).
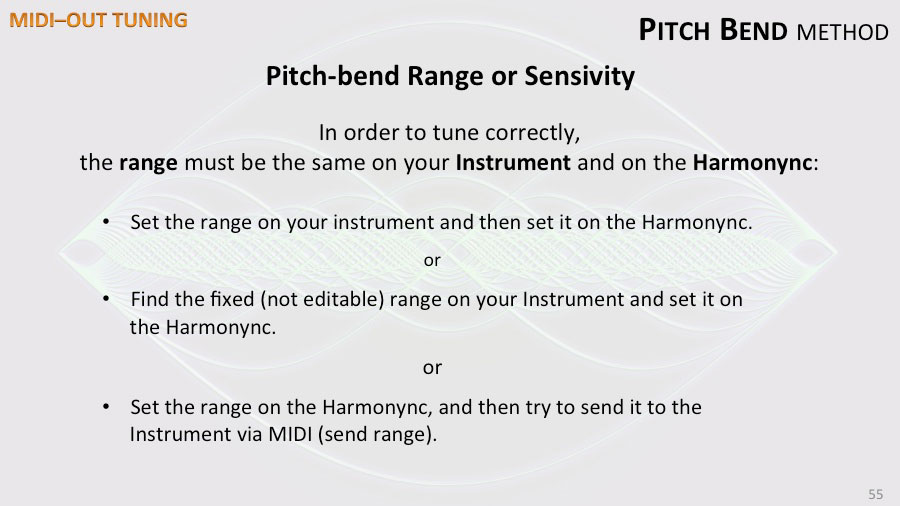
The range must be the same on your Instrument and on the Harmonync.
You have to check the default Pitch Bend range of your instrument. It could be set directly on the instrument. With some instruments you can send the Pitch Bend range via MIDI Control Change messages too.
This is the most important parameter. If it’s not properly set you will get wrong frequencies and no harmonic ratios.
The smaller the range, the higher the accuracy. That is: a smaller range, gives you a more precise frequency computation. You can get the most precise possible tuning resolution, setting 1 semitone (100 cents) both, on the Harmonync and on the instrument. With a Pitch Bend range of 1 semitone, you have potentially a 0.01 cents resolution.
Unfortunately the Pitch Bend range setting could be uneditable or hidden on some instruments.
If the Pitch Bend range is not editable on your instrument or you can’t find the setting, you have to know what is its value and set it on the Harmonync. In this cases you can detect the Pitch Bend range by ear, trying to push the pitch-bend wheel up to the limit and listen to how far it goes in semitones. You can compare it to the next few notes on the keyboard, played without bending. For example, if your instrument has a fixed Pitch Bend range set to 7 semitones, you have to enter number 7 in this field and press enter.
Multitimbral instruments allow you to load a different patch on each channel. Therefore the pitch bend range settings may be different if you use two different patch on the FTs and HTs. That is why there are two input text boxes: one on the green side and the other on the blue side. If you are using the same instrument or patch for FTs and HTs, you have to enter the same value twice.
As I said earlier, some instruments can receive the Pitch Bend range via MIDI Control Change messages; to try to sending it, click on “Send Range”.![]()
Voice Stealing
When you try to play more notes than the channel’s available polyphony voices (in our case: one), the last pressed note can or cannot “steal” the voice to another pressed key. The management of the stealing process is done by the Harmonync itself. Turn ON or OFF this feature. 
The idea is to better manage the Channel MODE 3 instruments, where POLY is ON.
Sending useful MIDI messages
There are some other commands that are independent of the method you use.
In the common red area, there are:
- Program Change
- Local Control ON/OFF
- All Notes OFF
- and other useful messages
Channel Program/Patch Change
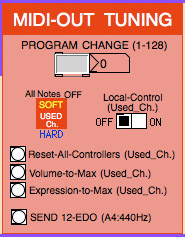
With the input text box “PROGRAM CHANGE (1-128)” you can change the patch or program (in other word, the sound) on your instrument, sending a Program Change message. Just write the program number (from 1 to 128) and press enter. It changes the patch on all used channels. If you are using a multitimbral instrument, it could be useful to set the same patch on all the used channels, at one time.![]()
Local Control ON/OFF
As we saw in the “Physical Instrument” section, if you want to use the Instrument’s keyboard to playing the Instrument itself, you have to set Local Control OFF in your instrument. In this scenario, the instrument turns off the keyboard’s connection to its local synthesizer. But the keyboard MIDI signals are sent to the input of the Harmonync, that resends the retuned message back to the instrument’s input. So, the synthesizer plays the right tuned note.
Check if your instrument is Local Control OFF capable and how to set it up.
Some instruments, can receive the Local Control mode message, remotely, via MIDI. So, for convenience, you can try to send a MIDI Local Control ON or OFF message to your instrument, clicking on this switch: ![]()
All Notes OFF messages
It’s the classic “Panic” function. It turns all notes off if some voice got stuck on.  There are three methods to turn off stuck notes:
- A soft method:

- sending a MIDI All-Notes-OFF message on every active channel.
- And two hard methods (clicking on the word “HARD”):

- sending hundreds of individual Note Off on every active channel (8nH messages);
- sending hundreds of individual Notes On, with velocity set to zero, on every active channel (9nH messages).
You can use the method you prefer. But (if you can) it is always better to use the “Panic” or “All Notes OFF” function on your instrument. This is because you have to pay attention to old hardware machines.
Of course, no problem with software virtual instruments.
Other useful messages
The remaining controls are used to send some useful MIDI messages.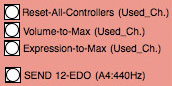
- Reset-All-Controllers
It sends a MIDI Controller 121 message which normally turns off (or resets) foot switches, expression controllers, mod wheel, aftertouch, and centers pitch bend. It sends also a MIDI Controller 64 message to turn off the sustain pedal. - Volume-to-Max and Expression-to-Max
These controls set the Volume and Expression parameters to the maximum value. It could be useful in some cases. - Send 12-TET/EDO (A=440Hz): In order to use the Pitch Bend method, the instrument tuning must be the standard “equal temperament” with the A set to 440 Hertz. If you have retuned the instrument via MTS System Exclusive, you can restore the “equal temperament” clicking here.
 |
This content is copyrighted: © 2015 Walter Mantovani – Some right reserved. |
|---|---|
| This work is distributed under the Creative Commons Attribution-NonCommercial-ShareAlike 4.0 International license. |
This content has been updated on May 23, 2016 at 4:46 pm