Since the Harmonync is a prototype not yet suitable for the production, i suggest you use it in studio rather than onstage.
Usually recording studio is synonymous with DAW. So, in this tutorial series we are going to explain how to retune MIDI instruments passing through Logic Pro. In particular, how to record and edit your performance. This is a bit more difficult than playing the Harmonync directly, without recording and playback.
I do not recommend to directly record the Harmonync MIDI output because you have pitchbend and channel informations that are not so easy to handle: you risk to make a mess by rearranging the Harmonync output!
Since actually there are no tutorial for other DAWs, reading about Logic can be useful to get the general guidelines of the required MIDI routing.
We will create three different templates, with which you can retune almost any types of instrument.
Table of Contents
Prerequisites
SW & HW
Start with the homepage of this site. In particular the “Quick start” section.
To follow this tutorial you need the following software installed on your system:
- Mac OS X 10.5 or higher (tested up to 10.9)
- Logic Pro 8 or higher (Logic Express does not fit)
- Pd-Extended 0.43.4 for Mac OS X
- the lastest version of the Harmonync*
The required hardware may vary. It depends on your needs. To take advantage of the full potential of the Harmonync, you need at least a MIDI master keyboard with four octaves, or 49 keys, minimum.
You can retune both hardware and software instruments. Some instruments are better suited to be retuned than others. The distinctive features of each instrument will be discussed later.
* This tutorial series is made using Harmonync v0.7-alpha released on July 25, 2015.
Knowledge base
Finally, you need a knowledge base about how the Harmonync and the MIDI protocol work:
- read the Harmonync’s “Draft of Specifications and User Guide“
- watch the first video guide (upcoming)
- read the slides related to the (upcoming) first video
MIDI routing overview
It is more likely that you have a software rather than a physical instrument. For this reason, these first tutorials are about retuning a virtual instrument (also referred to as VI). In Logic Pro, the VIs are called “software instruments”.
The following diagrams give an overview of what we are going to do.

Fig. 1
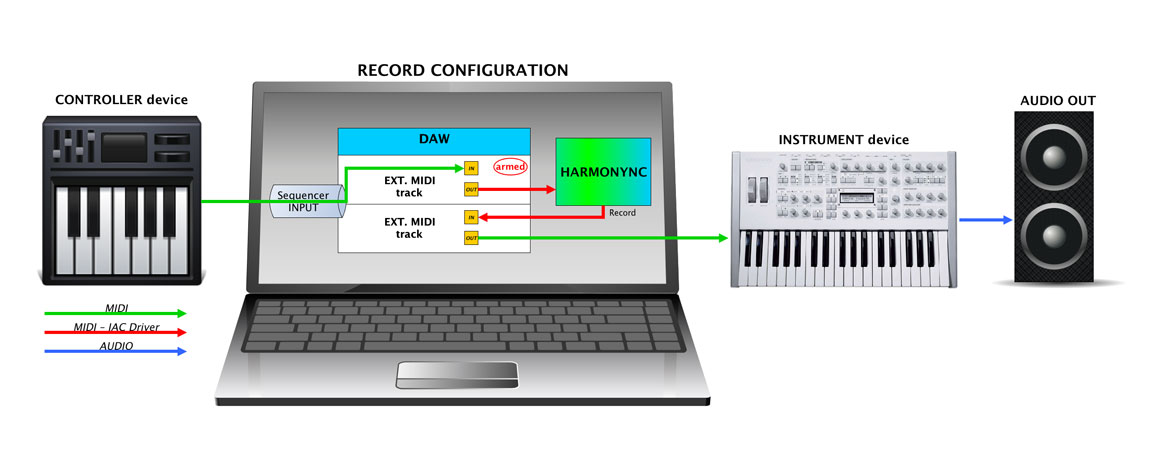
Purpose of this configuration is to record the original performance coming from the keyboard, hearing the retuned audio output from the instrument.
In Figure. 1:
- There is a normal MIDI track where you can record your performance coming from the keyboard/controller. This track must be record-armed.
- The output of this track is sent to the Harmonync (on a MIDI channel of your choice).
- This MIDI messages are then routed to the pitchbend-method retuner module.
- The retuned notes and other events then come back into Logic via the Environment, where they are routed to the instrument plugin hosted in a Logic’s Channel Strip.
Now that we have recorded the notes on the normal MIDI track, we can rearrange our performance. When the changes are done, we can switch the configuration to Mixdown.
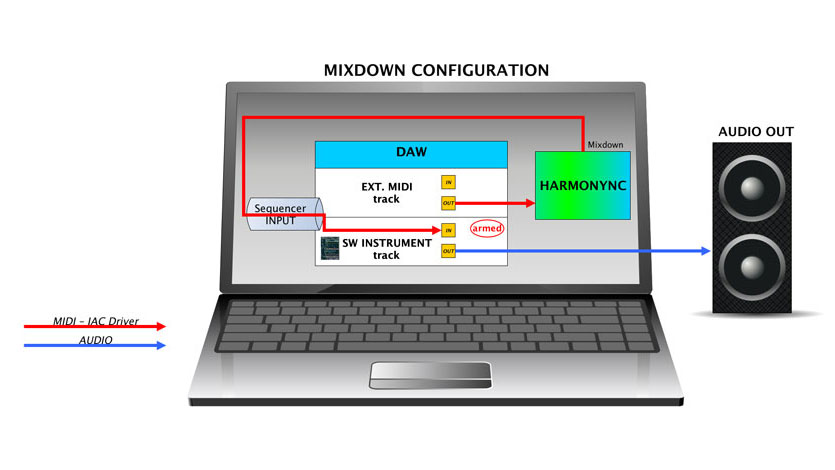
Fig. 2
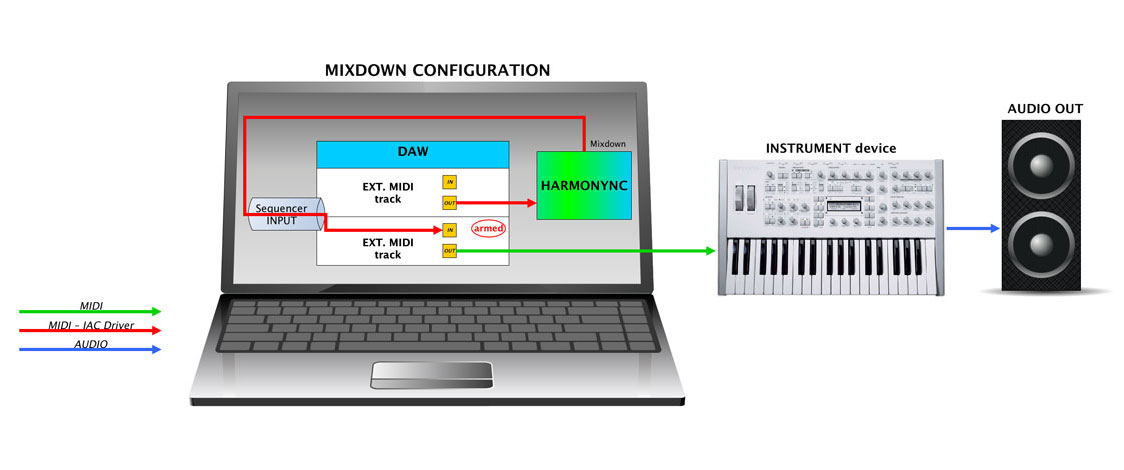
We recorded the notes from the keyboard at first. Now, we are going to record retuned notes coming from the Harmonync.
We might say that the mixdown is a sort of render of the original performance. In this way, the pitchbend messages and the channel informations will be recorded.
In Figure 2:
- There is a normal MIDI track where your original performance is recorded.
- When you play the sequencer recording, the notes recorded on this track are read, and the output is sent to the Harmonync (on a MIDI channel of your choice).
- This MIDI messages are then routed to the pitchbend-method retuner module.
- The retuned notes and other events then come back into Logic’s sequencer input, where they are routed to the instrument plugin hosted in an record-armed Logic’s Channel Strip.
Now you can playback the retuned instrument without the Harmonync. In this way you can also use the Freeze feature of Logic to free up the CPU from this instrument and any effects it uses.
Beware of MIDI loop!
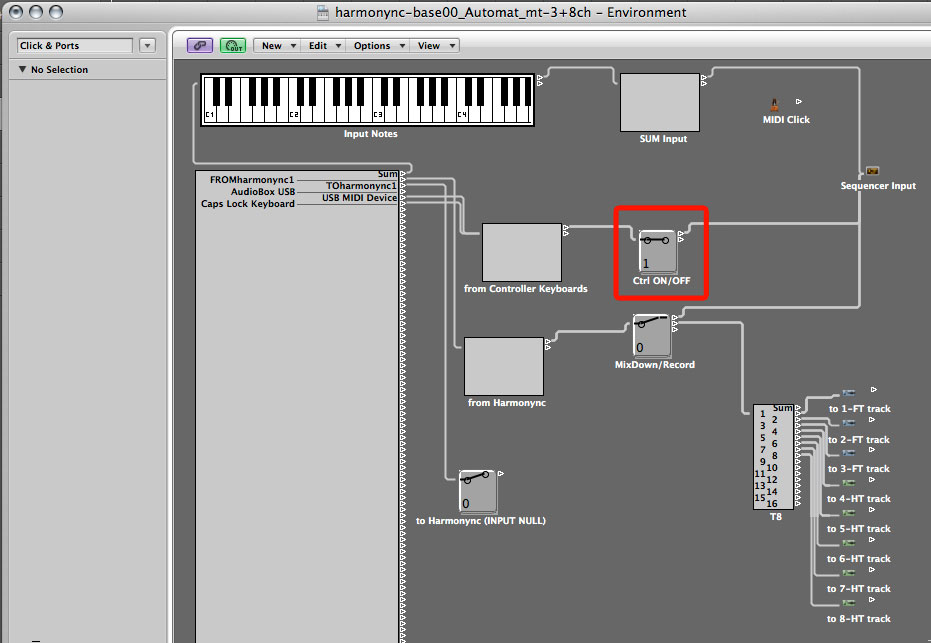
When you are in the Mixdown configuration you could generate an infinite MIDI loop if the external MIDI track is record-armed:
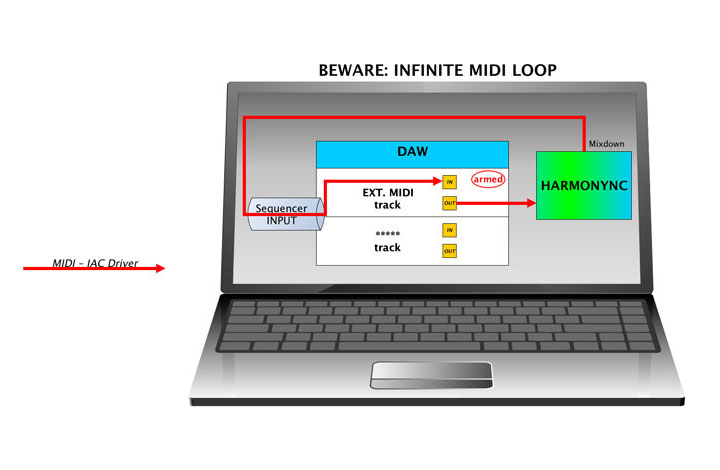
Fig. 3
This can happen by starting the playback or pressing a key on the input keyboard/controller. Un-arm the MIDI track to stop the loop or switch to “Record” configuration.
Other configurations
Obviously you can also retune a physical instrument.
Record configuration
Mixdown configuration
(click on the figures to enlarge)
Furthermore, if the instrument has a keyboard and the Local Control OFF mode capability, you can play and retune the same machine.
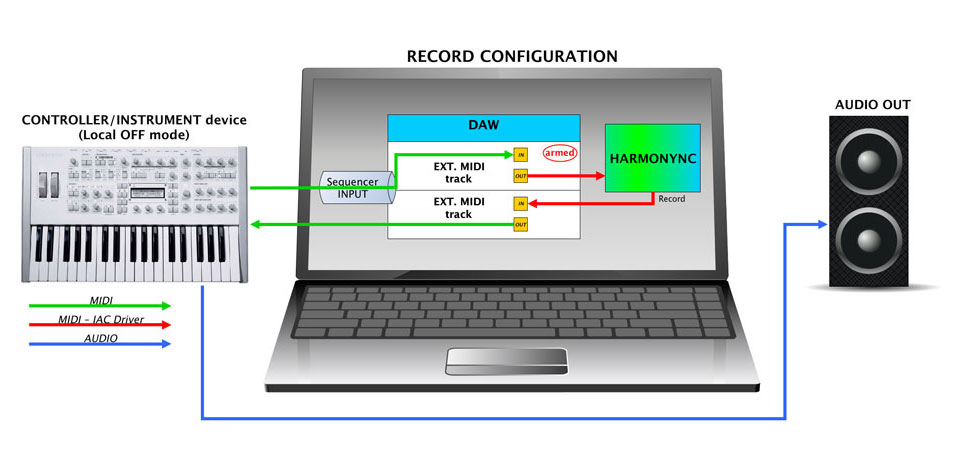
Record configuration in Local Control OFF mode
As I said, these first tutorials are about retuning a virtual instrument. So we do not discuss these cases… for now.
Ok, now we are ready to start.
Configuring Mac OS X: Driver IAC
In order to connect the Harmonync to Logic Pro you need at least a MIDI port.
If you have a MIDI device with many I/O ports, you can physically wire the routing configuration we are going to see.
For convenience we will use the OS X’s native IAC bus drivers. With IAC drivers you can create as many virtual MIDI ports as you need, ready to connect your applications.
In the Finder search for “Audio MIDI Setup” application and launch it. It’s under /Applications/Utilities/.
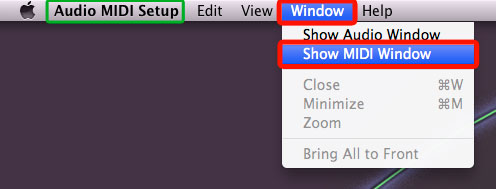
To open the MIDI window you have to click “Show MIDI Windows” under the “Window” menu.
(If you have Mac OS X Leopard (10.5) or below, there is one window with “Audio Device” and “MIDI Device”. You have to click on “MIDI Device”.)

- In the “Midi Studio” window double-click under the red box “Driver IAC”.
It will be opened the window “Driver IAC”.
- Check the “Device is online” checkbox if it’s not.
- Create two ports in the “Port” box using the [+] button
- Rename the two new ports into “FROMharmonync” and “TOharmonync” as in the previous screenshot.
Now we have two MIDI ports/buses: one brings the data FROM Harmonync to Logic and the other from Logic TO Harmonync.
We do not use a single port and its two (input and output) channels because it is more complex and it can generate data loops and misunderstandings. Why should we economize? It is virtual! 😉
Configuring Pure Data
MIDI input/output ports
Launch Pd-extended.
It is not required that the Harmonync patch is loaded. Settings on Pure Data are saved globally as an application preference and not in the patches.
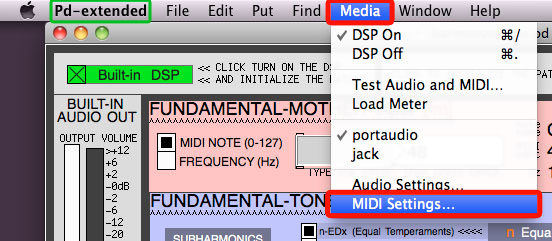
Under “Media” menu, click on “MIDI Settings…”.
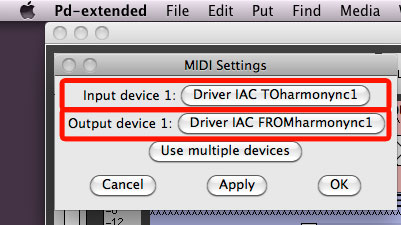
You just have to set input and output devices as shown in the previous figure.
- Input device >>> TOharmonync
- Output device >>> FROMharmonync
Sometimes the MIDI port labels go to shit, but you just have to rely on the name: TOharm… and FROMharm…
Then click on [OK] to apply changes and close this window.
Audio output port
What follows is not obligatory but is highly recommended because the tuning process may be complex and it’s very easy to get a wrong tuning.
To test the tuning (and avoid wrong frequencies) could be useful a reference sound.
Also for this purpose, the Harmonync provides an internal DSP to generate simple sounds. Even if we’re going to generate the sound by a synthesizer or a sampler, the internal DSP is very useful as a diapason reference.
If the frequency of the note made by your instrument is the same of the one made by the DSP, you have done a good job and your instrument is well retuned.
You can also check the tuning with polyphony to be sure that the channel-layers are received in the right way and the MIDI Channel Mode 4 (aka guitar mode) is correctly implemented on the instrument.
No matter where you want to output the DSP sound: it can be the same soundcard you are using with Logic (if this doesn’t cause problems) or another one. The important thing is that you can hear the two outputs together.
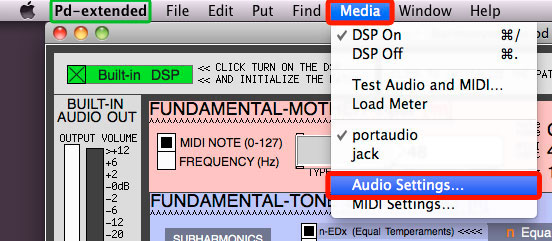
Under “Media” menu, click on “Audio Settings…”.
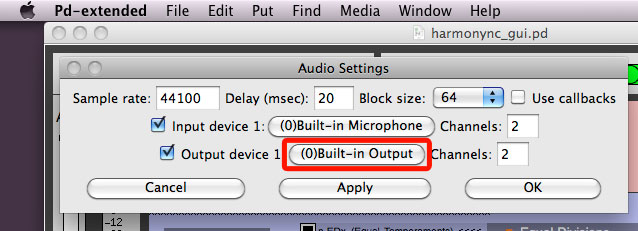
You have to set the output device as shown in the previous figure. We don’t need any input.
Then click on [OK] to apply changes and close this window.
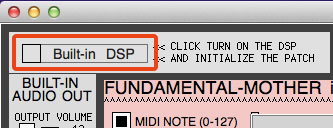
To activate the DSP, just click on the checkbox as in the following figure.

When the instrument is well-tested, you can switch off the DSP.
Now you can read to the next step: Where to start?
 |
This content is copyrighted: © 2015 Walter Mantovani – Some right reserved. |
|---|---|
| This work is distributed under the Creative Commons Attribution-NonCommercial-ShareAlike 4.0 International license. | |
| Logic is a trademark of Apple Inc. | |
This content has been updated on January 13, 2016 at 9:48 am