Table of Contents
Initialize the patch
If you are going to use the MIDI-OUT TUNING to play a synthesizer or a sampler, you can just initialize the patch clicking here.
![]()
Built-in DSP
To use the internal DSP, one click on the check box “Built-in DSP” on top left. When it is green, the Pure Data internal DSP is turned on.
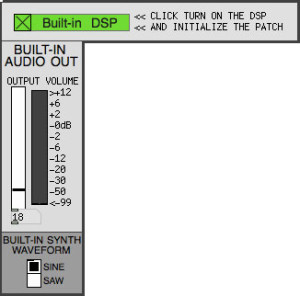
You can control the output volume and the waveform: sine or sawtooth.
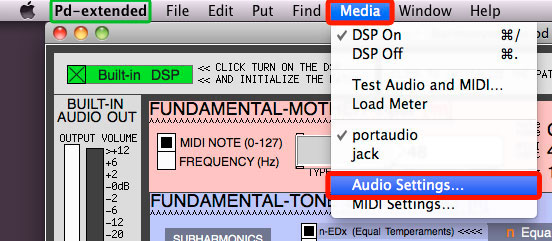
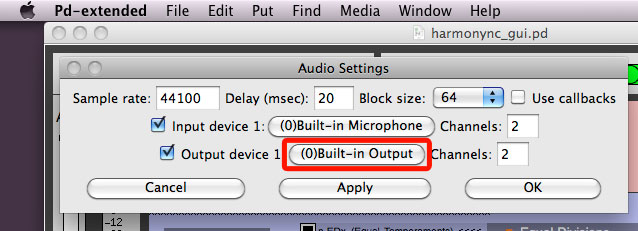
The audio output port is set in PD options.
In this way, the patch is automatically initialized and the default settings are loaded. With just the default settings and the “Built-in DSP”, you are ready to play.
FT & HT Areas
We have two main areas: the blue ones and the green ones.
The blue areas are about FUNDAMENTALS.
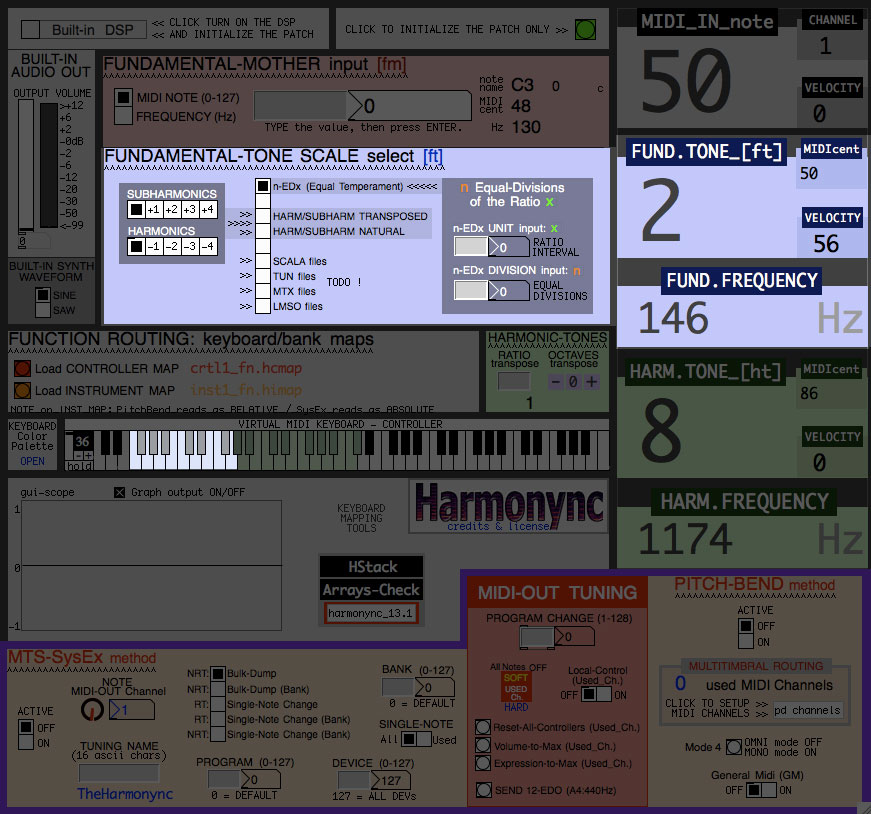
The green areas are about HARMONICS (also called overtones).
Right monitor panel
On the right, there is a panel to monitor the MIDI input and the processed output in real-time. It is mainly for debugging purposes. It is big because we can see better.
Gray area
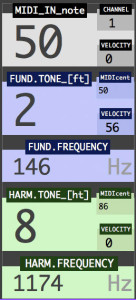
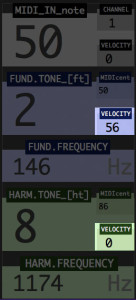
The first area shows the MIDI INPUT note.
In this early version the Harmonync listens from all the channels and there is no filter that allows you to select the input channels. So, here you can read the input note number, its velocity and the channel.
The MIDI PORT is set in PD options.
Blue & Green areas.
The blue and green areas are respectively for the FUNDAMENTALS and HARMONICS. In each of these areas there are four values.
The big one is the TONE number, that is the key-function associated with the key that we pressed. These numbers are defined in the CONTROLLER KEY-MAP file.
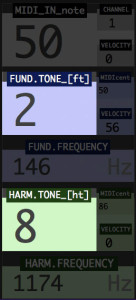
The MIDIcent areas and the FREQUENCY areas show the computed output: the first in MIDI notation, the second in Hertz.

The MIDIcent notation is intended to be read in this way:
- the whole number (the integer) is the MIDI NOTE NUMBER;
- the decimals indicate how many cents above of the note.
The VELOCITY area shows the velocity MIDI value, for debugging.
MIDI OUT Tuning
On the bottom, there is the MIDI-OUT section.
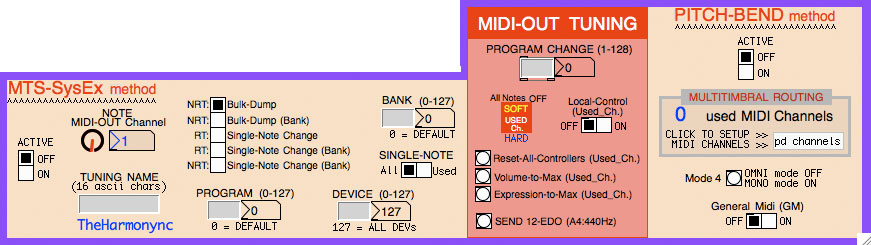
I’ll explain MIDI tuning methods in the “MIDI output” part.
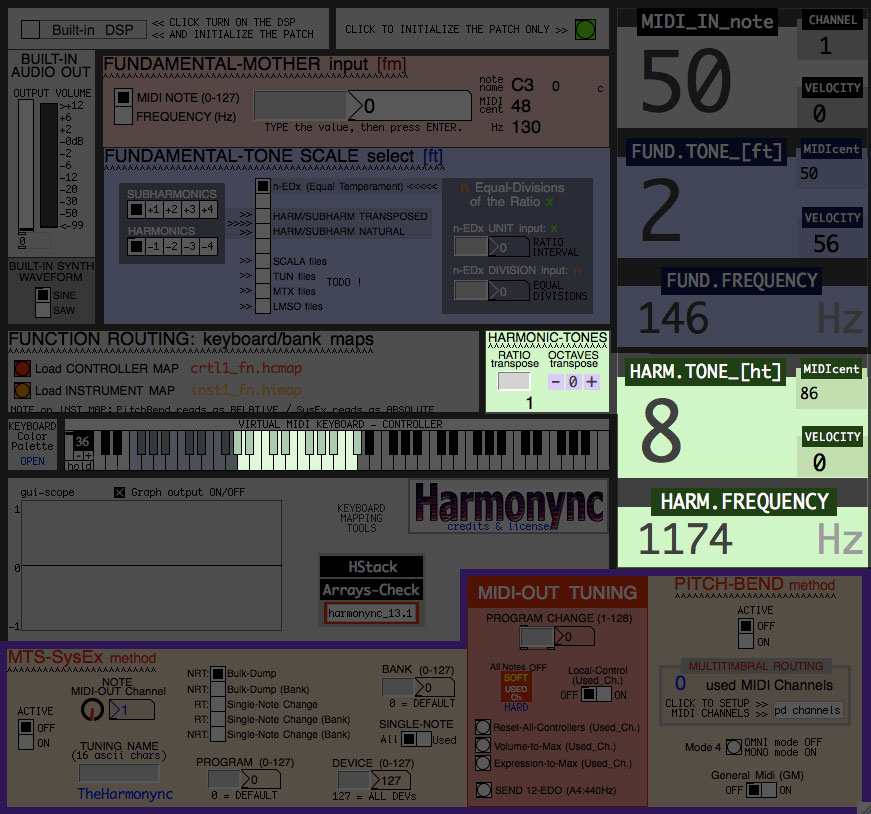
Virtual Keyboard
In the middle, we have an on-screen-virtual-keyboard.

It has three main functions:
- Controller Key-Map viewer;
- Virtual controller;
- MIDI input monitor.
It is a Key-Map viewer. It shows the content of the current loaded CONTROLLER MAP FILE in a visual way.
It is a virtual controller. When you click a key, it generates a note MIDI signal towards the Harmonync. You can set the VELOCITY of the notes and you can go UP or DOWN by octaves.
The virtual-keyboard is also a monitor for the controller. By pressing a key on the MIDI keyboard/controller, it gives you a visual feedback.
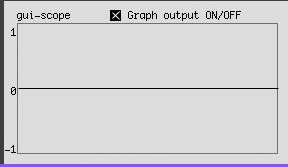
Oscilloscope
Below the keyboard there is a simple oscilloscope that shows you the output from the internal DSP. It is just a visual feedback. When using the MIDI TUNING OUTPUT, the DSP can be switched off and therefore the oscilloscope is useless.
Other useful tools
Here, here are two other useful windows:
H-Stack
Click on the “HStack” black button. ![]()
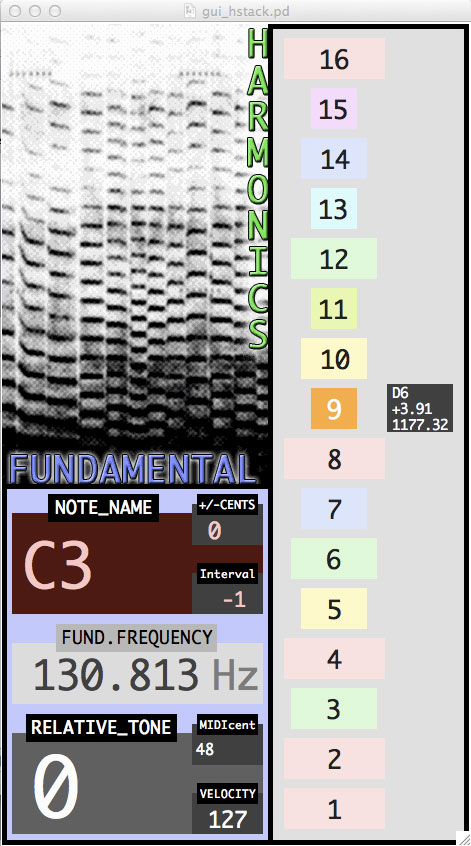
The H-Stack window gives you informations about what you’re playing. It is very useful to better understand the Harmonync.
On the bottom left, we have a panel that gives you informations about the last pressed FUNDAMENTAL (that is currently generating the HARMONICS).
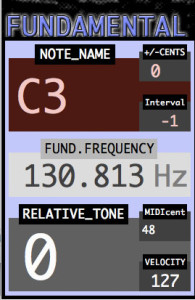
In this example we are pressing the Fundamental Key number zero (RELATIVE_TONE), that is generating a C3 (NOTE_NAME) at the frequency of 130.813 Hz (FUND.FREQUENCY).
When you press an HARMONIC key, you can read its informations in the stack on the right.
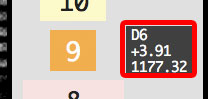
In this example we are pressing an Harmonic Key that is generating the 9th harmonic. In this example the current Fundamental is a C3 (130.813 Hz), so we have a 9th harmonic as a D6 +3.91 cents, that is the frequency 1177.32 Hz.
For each Harmonic Key we press, a black box appears on the left of its harmonic number. In this box we have:
- the note name.
- the variation in cents from this note ( + or – ).
- the frequency value in Hertz.
Because of the limited space, I did not write the units.
( NOTE that, if you are using the TRANSPOSING TOOL, you could not have harmonic ratios between the fundamental and harmonic! )
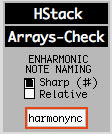
Arrays Check
There is another tool. It is useful just for debugging.
Click on the “Arrays Check” black button. ![]()
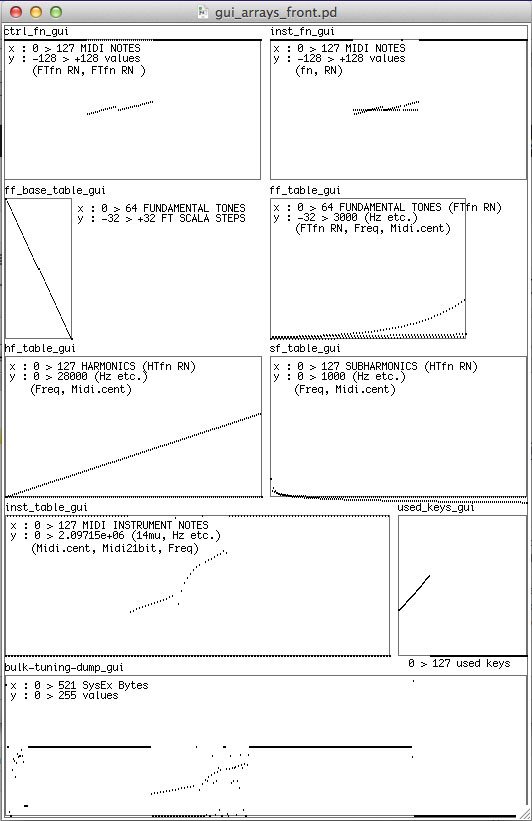
This window shows a copy of the main memory arrays in one panel. All these arrays form a little database that contain most of the settings. If something doesn’t work and you know the meaning of the arrays, you can open this panel to check them. These are only copies of the original arrays. They must be initialized, only once, just pressing a fundamental key to load and see the current state. The last array on the bottom is used when MIDI-system-exclusive method is active.
In order to save resources, both of these monitor-windows are not loaded at startup with the main patch.
Enharmonic equivalents naming
In some labels of the GUI you have the name of the notes expressed in the Scientific Pitch Notation.
For the enharmonic equivalents (like C♯ and D♭, D♯ and E… and so on) you can set a fixed Sharp (♯) or a Relative notation.

- With the fixed Sharp notation all the enharmonic equivalents are written as SHARP.
- With the Relative notation the enharmonic equivalents are written as sharp (♯) on ascending intervals, and as flat (♭) on descending intervals.
Default is fixed Sharp (♯).
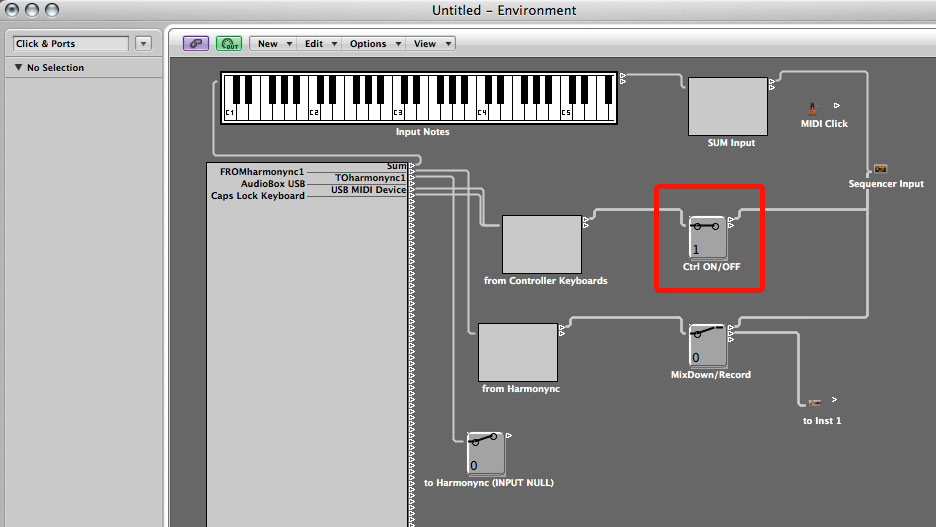
What lies behind the GUI.
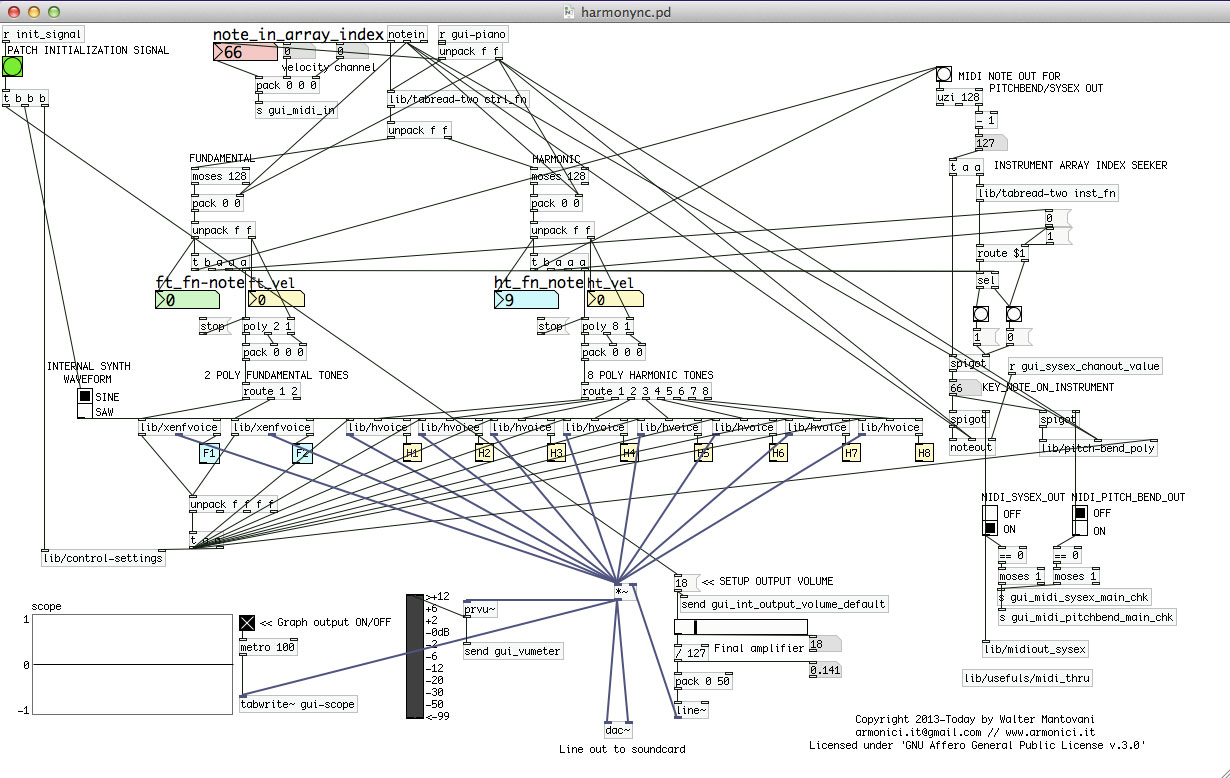
Finally, the button with the red border opens the true PD patch: what lies behind the interface. ![]()
Don’t open it. (if you are not a developer). This button is the instance of the other file in the root directory of the patch. Almost all the sub-patches are loaded here.
Now you can read the next step: Settings Overview
 |
This content is copyrighted: © 2015-2106 Walter Mantovani – Some right reserved. |
|---|---|
| This work is distributed under the Creative Commons Attribution-NonCommercial-ShareAlike 4.0 International license. |
This content has been updated on June 12, 2016 at 7:06 am