Table of Contents
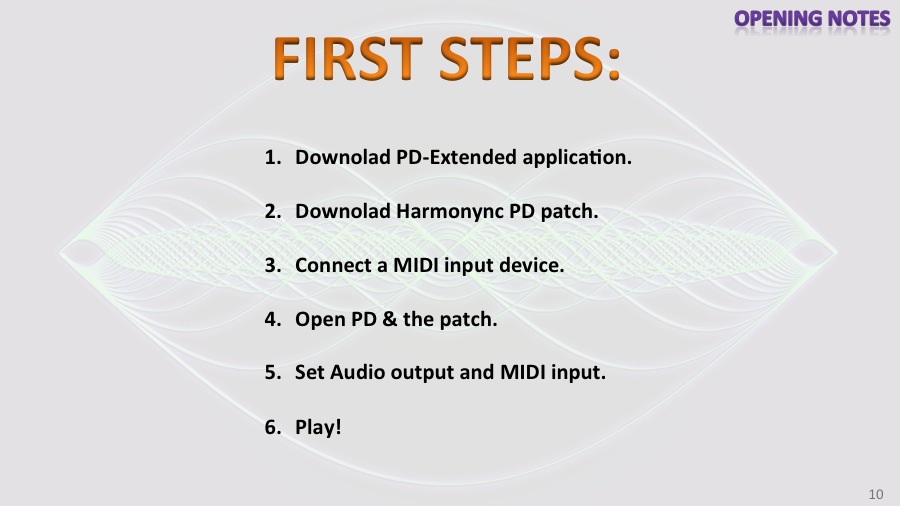
step 1: Download Pd-Extended
You have to download and install Pd-Extended, that is Pure Data with useful libraries. Pd-Extended is available here.
In particular the Harmonync was developed with Pd-extended 0.43.4 under Mac OS X but it should run on other platforms. In this first tutorial we are going to install the patch under Mac OS X.
If you are using Mac, you need X11 installed. Since it is no longer included with OS X, you can download it here.
step 2: Download Harmonync PD Patch
You have to download the Harmonync PD Patch.
The lastest version of the Harmonync is available here.
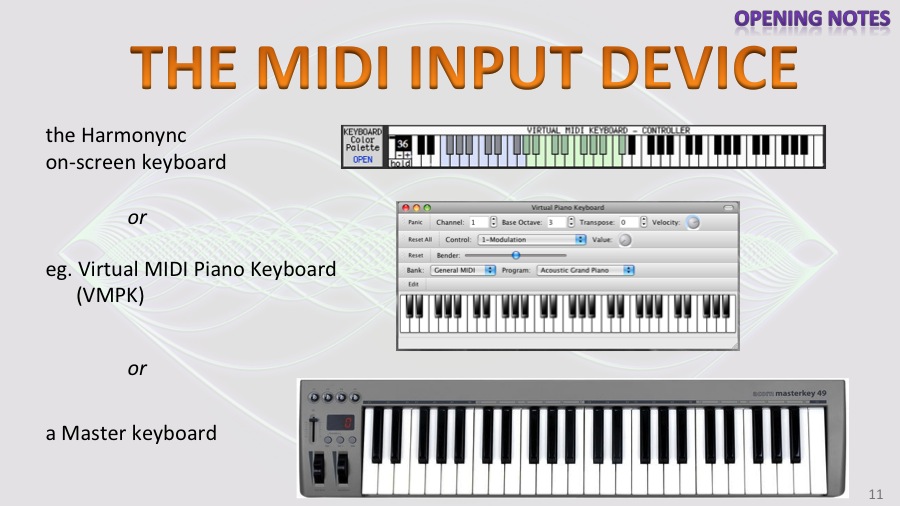
step 3: The MIDI input device
You have to set up a MIDI input device which acts as Controller.
For example, a master keyboard is good!
If you haven’t an input device, you have to play with the mouse using the on-screen keyboard, but you can not take advantage of many features of the Harmonync.
You can also use a software that allows you to generate MIDI signals from your PC keyboard, but the key range could be too limited.
I suggest a master keyboard with at least four octaves, or 49 keys.
The input MIDI device and port must be active and available to the system before launching PD, otherwise it will not be recognized.
If your keyboard/controller has just MIDI ports and no USB interface you can use an USB MIDI adapter, like this:

step 4: Open PD & the patch
If the initial setup is ok, we can proceed and open the Harmonync Patch.
Double click on the “harmonync_gui.pd” file.
If the .pd extension is not properly associated with the PD-Extended application, you can obviously load the patch from the “File” menu.
Here we are! This is the main window.
step 5: Set MIDI input and Audio output
Now we need to set the MIDI and Audio ports in PD settings. These settings are stored as an application preference and not in the patch.
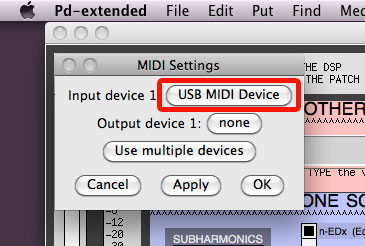
From “Media” menu, click “MIDI settings” and (for now) only set the Input device 1.
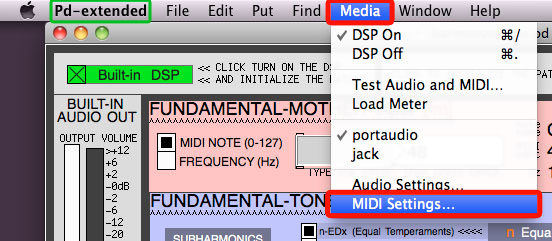
Set the MIDI input port where your controller/keyboard is connected to. At this time we leave MIDI output to none, because initially we’ll use the internal synthesizer provided with the patch. Click OK when you’ve done.
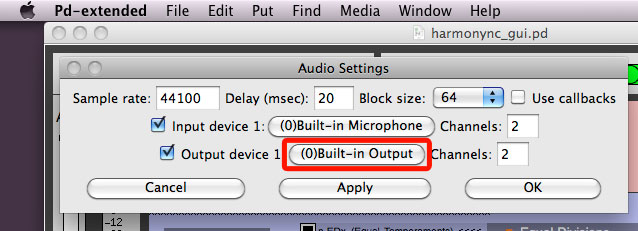
Then, in the same “Media” menu, click on “Audio settings” and check if the Output Device is properly set.
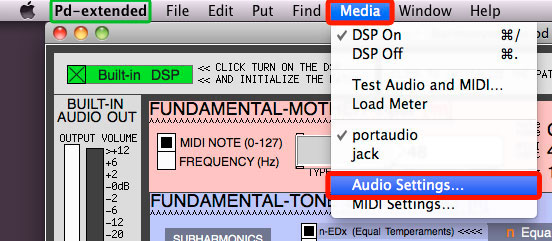
Set your soundcard output. At this first time, we send directly out the sound from the Harmonync.
step 6: Initialize the patch and play
One click on the check box “Built-in DSP” on top left.

When it is green, the Pure Data internal DSP is turned on. In this way, the patch is automatically initialized and the default settings are loaded.
If you will use the MIDI-OUT TUNING to play a synthesizer or a sampler, you can just initialize the patch clicking here and leaving the DSP turned off.
![]()
With the default settings and the “Built-in DSP”, you are ready to play!
Alerts & Notes
Displaying correctly the GUI
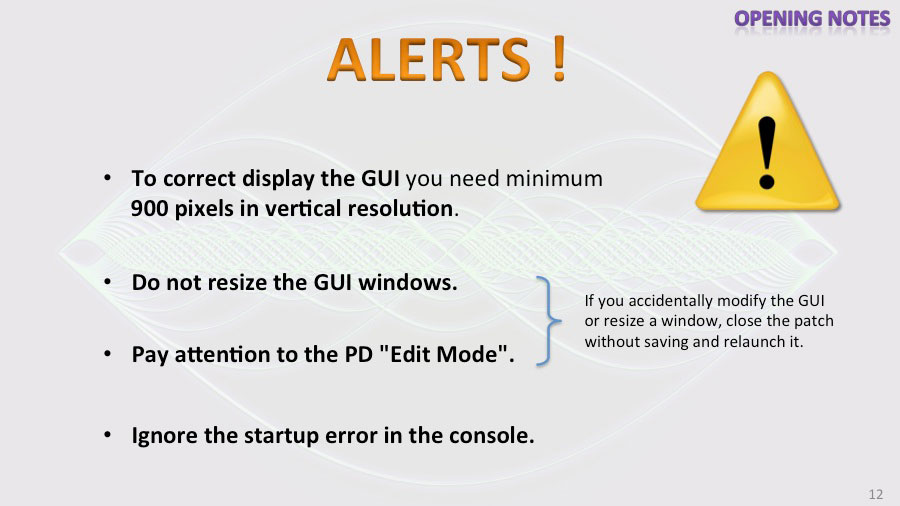
I’m sorry, but to correctly display this big window you need to set your video adapter at minimum 900 pixels in vertical resolution. We have to fix this problem by dividing this window into multiple, smaller windows that the user opens just when he needs.
Do not resize any GUI windows
If, for some reason, you resize a GUI window and you cannot restore its dimensions, close the patch without saving changes and reopen it.
Pay attention to the PD “Edit Mode”
Since Pure Data is a development framework, you can play a patch but you can also edit it. Under “Edit” menu you can switch the Edit Mode. Also pressing COMMAND+E . You can switch from the Play Mode to the Edit Mode and vice-versa. Under the Edit Mode you cannot interact with the interface and you can compromise it. The mouse pointer is different. It’s a pointing finger:

If, for some reason, you enter the Edit Mode and you move, delete or change something, close the patch without saving changes and reopen it.
Startup errors in console
On the PD console you have an error, in red:

But don’t worry, it can be ignored. It is just about the fonts of the input boxes. The error appears only one time, when you open the Harmonync patch, and shows only this notice in the console.
On Windows systems you get this message: “midiin: windows: not supported”:
![]()
Also this message can be ignored. I didn’t test the Harmonync under Windows very much, but it usually works without problems.
Under “Edit” menu you can clear these messages clicking on “Clear console”. If you close the PD Window Console, you can re-open it clicking on “PD window”, under the “Window” menu.
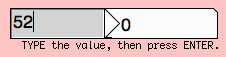
Entering values in the text boxes
In the main window there are some text boxes that allow you to insert and edit parameters. After typing the value, just press enter to confirm:
About Polyphony
Since there are more ways to play the Harmonync, the number of voices of polyphony depends on the tuning method and the instrument specifications.
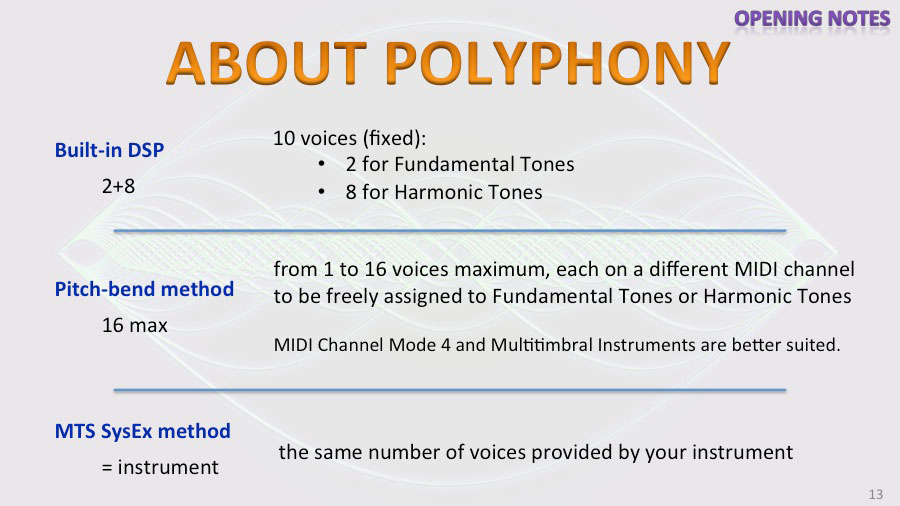
Built-in DSP
The Harmonync’s “Built-in DSP” is polyphonic. It has 10 simple oscillators. You have 2 voices of polyphony for Fundamental Tones and 8 voices of polyphony for Harmonic Tones.
Pitch-bend method
With MIDI out Pitch-bend method you can have, in theory, 16 voices of polyphony maximum to be divided between the Fundamental Tones and the Harmonic Tones.
Each voice is routed to a single MIDI channel, so the maximum number of voices of polyphony depends on the MIDI specifications of your instrument. MIDI Channel Mode 4 and Multitimbral Instruments are better suited to the pitch-bend method. To a deeper understanding of the pitch-bend method polyphony, go to the part: MIDI Tuning Output.
MTS SysEx method
Finally, with MIDI Tuning Standard SysEx, you have the same number of polyphony voices provided by your instrument.
NEXT: GUI Overview
 |
This content is copyrighted: © 2015-2016 Walter Mantovani – Some right reserved. |
|---|---|
| This work is distributed under the Creative Commons Attribution-NonCommercial-ShareAlike 4.0 International license. |
This content has been updated on June 12, 2016 at 7:12 am